Learn Automations in Oracle APEX: Part I
Discover how to automate processes in Oracle APEX using automations and DBMS_SCHEDULER. With Grixxo’s guidance, optimize the delivery of notifications, updates, and scheduled tasks to improve operational efficiency.
6 minutes read
Table of Contents
- Introduction
- Creating an Automation
- 2.1. Detailed Explanation of the Fields in “Create Automation”
- Configure Your Automation
- 3.1. Explanation of the Fields
- Setting Up Actions in the Automation
- 4.1. Error Handling in Automations
- 4.2. Server Side Condition
- Description of Views in Automation
- Conclusion
1. Introduction
Automation in Oracle APEX (version 20.2) allows you to automate recurring tasks such as sending notifications, updating data, or running batch processes without the need for manual programming with DBMS_SCHEDULER.
It acts as a simplified and powerful interface for scheduling automatic actions, improving efficiency and streamlining process management within applications.
2. Creating an Automation
This guide is a continuation of Task Definition in Oracle APEX v24 Part I, so we will use the Blog - Task Definition application. Once in the application, go to Shared Components and select Automations.
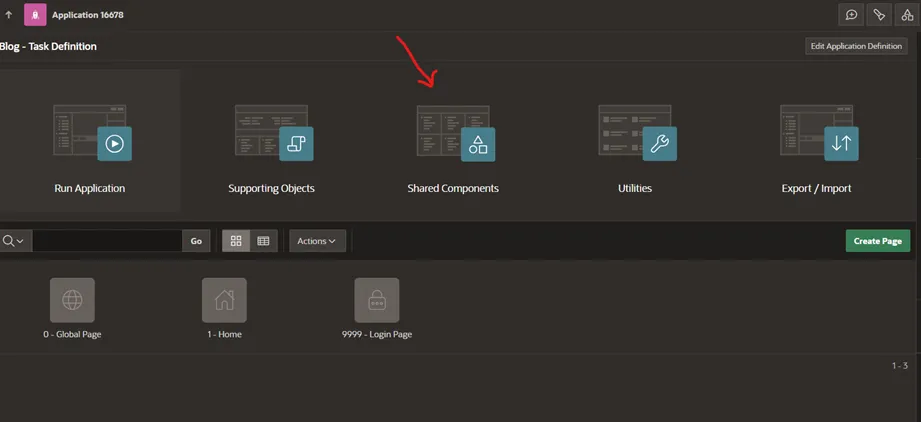

After clicking on Automations, select Create to begin creating a new automation.

After clicking, the following screen will be displayed.

2.1. Detailed Explanation of the Fields in “Create Automation”
- Name: Enter the name of the automation here. This name identifies the automated task within Oracle APEX. In this guide, the task name is Blog - Automation.
- Type:
- On Demand: The automation is only executed manually or when explicitly called using the
APEX_AUTOMATIONpackage. - Scheduled: The automation will run automatically according to the frequency set in the Execution Schedule field. If you choose On Demand, the Execution Schedule option disappears because a schedule is not required.
- On Demand: The automation is only executed manually or when explicitly called using the
- Actions Initiated On:
- Query: Actions will only run if the defined SQL query returns results. The returned data can be used within the actions.
- Always: Actions will always execute whenever the automation is triggered, regardless of any query result.
4. Execution Schedule: (Visible only if Scheduled is selected)
- Every 15 Minutes: The automation runs every 15 minutes.
- On the Hour: The automation runs at the beginning of each hour.
- Daily at Midnight: The automation runs every day at midnight.
- Custom: Allows configuration of a custom schedule using cron expressions or specific intervals.
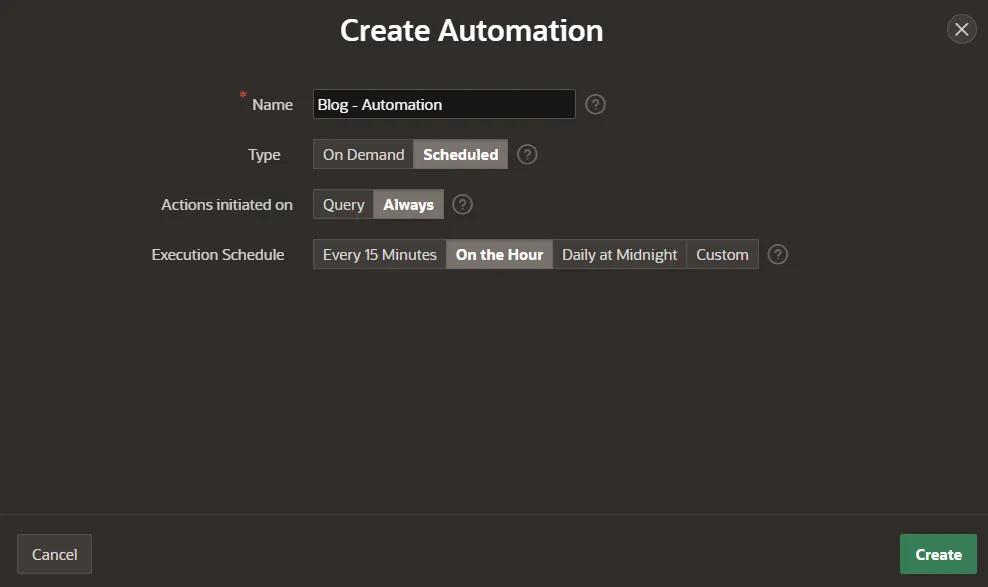
Click Create to proceed to action and condition configuration.
3. Configure Your Automation
Once the Blog - Automation automation is created, go to the Name tab, which presents three fields:
- Name: Name of the automation.
- Static ID: A unique identifier used to manually execute the automation with
APEX_AUTOMATION.EXECUTE. - Currently Executing: Indicates whether the automation is currently running.
The configuration of an automation in Oracle APEX allows defining how and when automated tasks will be executed within an application. This section provides advanced options to customize the automation behavior by setting execution conditions and managing its status. Below is an explanation of the key fields in the Settings tab.

3.1. Explanation of the Fields
-
Type:
- Scheduled: The automation will run automatically based on the set frequency.
- On Demand: The automation will only execute when manually invoked using the
APEX_AUTOMATION.EXECUTEpackage.
-
Schedule Expression:
Allows defining repetitive execution schedules using the Database Scheduler calendar syntax.
- Examples:
- “Every Tuesday and Friday at 4:00 p.m.”
- “The second Wednesday of every month.”
- You can enter it manually or use the Interval Builder (tool icon) to create simple expressions.
- For more complex schedules, it’s recommended to consult the DBMS_SCHEDULER package documentation.
- Examples:
-
Schedule Status:
Indicates the current scheduling status of the automation.
- Active: The automation will run according to the defined schedule.
- Disabled: The schedule is disabled, but the automation can be run manually.
- Error: The schedule was disabled due to an error in the last execution, but the automation can still be run manually.
-
Actions Initiated On:
Defines the data source that triggers the automation actions.
- Query: Executes a SQL query. Actions are performed per row found or once if no data is found.
- PL/SQL Returning Boolean: Executes a PL/SQL block that returns a boolean value. If it returns TRUE, the actions are executed.
- Always: Actions are always executed, ideal for scheduled automations regardless of data presence.
4. Action Configuration in Automation
Actions in an Oracle APEX automation define the specific tasks to be executed when certain conditions are met. These actions are essential for automating processes such as sending notifications, updating data, or executing custom procedures.
Once the automation is configured, you can add and edit actions to determine what tasks will be performed and how they will be executed.
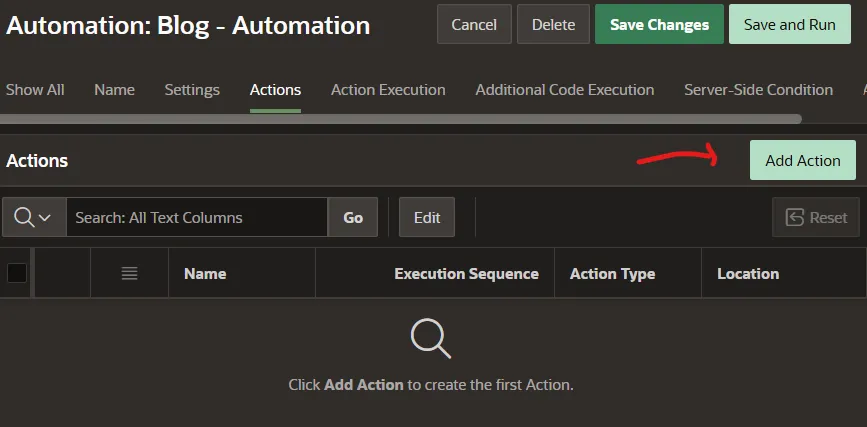
After clicking the Add Action button, the Edit Action tab will appear. Go to the Action tab.
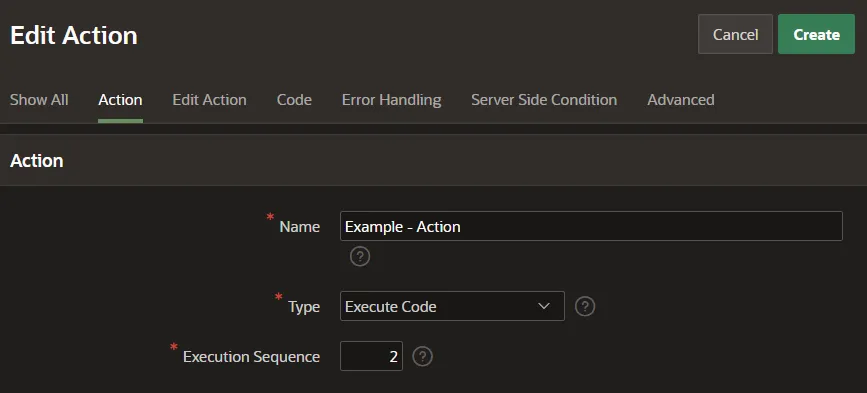
- Name: Enter a name for the automation action. This helps identify the action within your workflow.
- Type: Select the type of action you want to execute. Common options are:
- Execute Code: Executes a PL/SQL code block.
- Send E-Mail: Sends an email to specified recipients.
- Send Push Notification: Sends a push notification to an app user.
- Execution Sequence: Determines the order in which actions should be executed within the automation.
4.1. Error Handling in Automations
The Error Handling tab in automations allows you to configure how to handle errors that may occur during action execution. You can define an error message that will appear in the automation log if the action fails. It’s recommended to include #SQLERRM# in the message, as this is a substitution variable that will insert the actual Oracle error message.
Additionally, there’s an option called Stop Execution on Error. If enabled, the automation execution will stop when an error occurs while processing the current row. This means no further actions will run after the error, which is useful to prevent cascading failures from a single failed task.

4.2. Server Side Condition
The Server Side Condition option in automations allows you to add a condition that must be met before the action executes on the server. Here, you can select the type of condition you want to apply. This is useful when you want an action to run only if certain criteria are met, such as validating a variable or the status of a process or data. This condition ensures that actions within the automation run only when necessary, optimizing the workflow.

The Do not validate code (parse at runtime only) option in the Server Side Condition allows the condition’s code to be validated only at runtime instead of at design time. This can be helpful when the code depends on dynamic conditions or data only known during execution.
The Execute For Each Row option specifies whether the condition should be evaluated for each row returned by the query or just once. If selected, the condition is evaluated for each individual row, allowing for greater flexibility and control over which actions are executed based on specific data in each row.
5. Description of Automation Views
| View Name | Description |
|---|---|
| APEX_APPL_AUTOMATIONS | Stores the metadata of automations in an application. Contains information such as the automation name, application it belongs to, whether it is active, and its creation date. |
| APEX_APPL_AUTOMATION_ACTIONS | Stores the actions executed within each automation. For example, sending emails, updating records, or executing processes. Each action belongs to a specific automation. |
| APEX_AUTOMATION_LOG | Logs automation executions. Shows when it ran, whether it succeeded or failed, and may store additional execution messages. |
| APEX_AUTOMATION_MSG_LOG | Stores messages generated during automation execution. These can include information messages, warnings, or errors. They relate to a specific record in APEX_AUTOMATION_LOG. |
6. Conclusion
In summary, Automations in Oracle APEX allow automating tasks such as sending emails, push notifications, and executing code without manual intervention. You can configure actions based on schedules, specific conditions, or query data. With the integration of APEX_AUTOMATION and DBMS_SCHEDULER, tasks can run automatically or on demand, saving time and reducing…